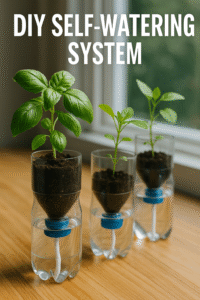
Tired of forgetting to water your plants — or accidentally drowning them? A DIY self-watering system using plastic bottles is the cheapest, easiest hack for plant care that even beginners can pull off. Here’s how to turn trash into a gardening treasure.
Why Self-Watering Systems Work
Plants like consistent moisture — not floods or droughts. A self-watering setup uses capillary action to deliver water as the soil dries out, keeping your plants happy even if you’re busy (or forgetful).
What You’ll Need
- 1 or 2-liter plastic soda bottles (cleaned)
- A sharp knife or scissors
- Optional: cotton string or old shoelaces (for wick method)
Method 1: Upside-Down Bottle Insert
- Cut off the bottom of the bottle.
- Poke 4–5 tiny holes in the cap with a thumbtack or hot pin.
- Fill the bottle with water.
- Push the neck into the soil near the base of your plant.
Why it works: As the soil dries, it draws water through the cap holes gradually.
Method 2: Wick System
- Cut the bottle in half.
- Invert the top half into the bottom (like a funnel).
- Thread cotton rope through the bottle neck — long enough to reach the bottom reservoir and up into the soil.
- Fill the bottom with water; add soil and your plant to the top.
Why it works: The wick slowly pulls water up into the soil as needed.
Best Plants for Self-Watering Systems
- Herbs (basil, parsley, mint)
- Snake plants
- Spider plants
- Peace lilies
- Pothos
Pro Tip:
Use multiple bottles in larger containers, or set reminders to refill every 5–7 days.
Recommended Gear:
With a few spare bottles and five minutes, you can build a system that saves time, conserves water, and makes your plants love you back — no tech or green thumb required.